728x90
<제 1강 캐릭터 움직이기 >

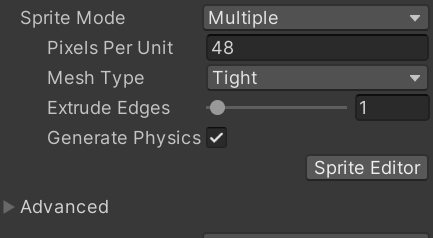
sprite editor로 들어가서 slice해주었다.
4행 3열로 slice 함
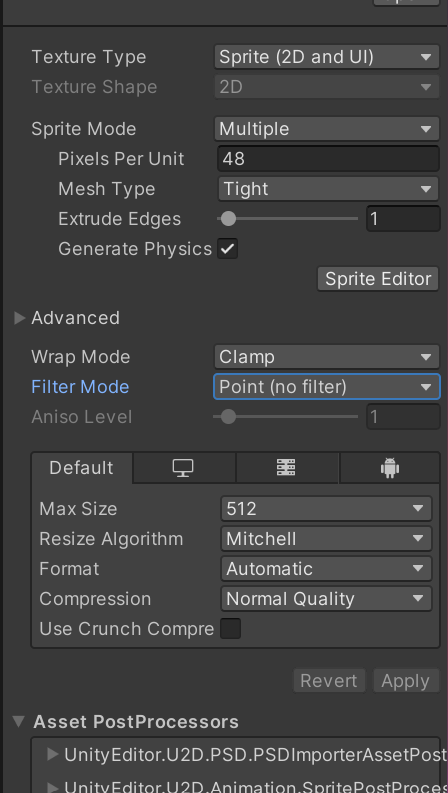
그 후 몇 가지 설정을 해주었다.

도트게임은 도트 그 자체를 보여주는 것이 좋기 때문에 point로 지정한다.

그 다음 assets폴더에 Scripts 폴더를 만들어주고 그 안에 MovingObjets c#파일을 만들어주었다.
using System.Collections;
using System.Collections.Generic;
using UnityEngine;

public class MovingObject : MonoBehaviour {
    public float speed; // 캐릭터 속도
    private Vector3 vector; //캐릭터 위치

    // Start is called before the first frame update
    void Start() {
    }

    // Update is called once per frame
    void Update() {
        if (Input.GetAxisRaw("Horizontal") != 0 || Input.GetAxisRaw("Vertical") != 0) {
            vector.Set(Input.GetAxisRaw("Horizontal"), Input.GetAxisRaw("Vertical"), transform.position.z);

            if (vector.x != 0) {
                transform.Translate(vector.x * speed, 0, 0); // 좌우
            }
            else if (vector.y != 0) {
                transform.Translate(0, vector.y * speed, 0); // 상하
            }
        }
    }
}
Input.GetAxisRaw("Horizontal") -> 우 방향키가 눌리면 1 리턴, 좌 방향키가 눌리면 -1 리턴
Input.GetAxisRaw("Vertical') -> 상 방향키가 눌리면 1 리턴 , 하 방향키가 눌리면 -1 리턴
vector.x의 값은 좌 방향키의 값(-1)이나 우방향키의 값(1)이
리턴 되므로 -1*2.4 혹은 1*2.4가 된다.
Translate는 현재 있는 값에서 vector.x*speed 만큼 더해준다.
yield return new WaitForSeconds(11);는 현재 실행을 중단하고 11초 후에 다음 라인으로 이동합니다. 이를 통해 특정 시간이 지난 후에 다음 동작을 수행할 수 있다.
using System.Collections;
using System.Collections.Generic;
using UnityEngine;

public class MovingObject : MonoBehaviour
{
    public float speed;
    private Vector3 vector;

    public float runSpeed;
    private float applyRunSpeed;
    public int walkCount;
    private int currentWalkCount;

    private bool canMove=ture;

    //speed=2.4, walkCount=20
    //2.4*20=48  48픽셸만큼 이동시킨다

    void Start()
    {
    }

    IEnumerator MoveCoroutine()
    {

        if (Input.GetKey(KeyCode.LeftShift))
        {
            applyRunSpeed = runSpeed;
        }
        else
        {
            applyRunSpeed = 0;
        }

        vector.Set(Input.GetAxisRaw("Horizontal"), Input.GetAxisRaw("Vertical"), transform.position.z);

        while (currentWalkCount < walkCount)
        {
            if (vector.x != 0)
            {
                transform.Translate(vector.x * (speed + applyRunSpeed), 0, 0);
            }
            else if (vector.y != 0)
            {
                transform.Translate(0, vector.y * (speed + applyRunSpeed), 0);
            }

            currentWalkCount++;

        }

        currentWalkCount = 0;
        yield return new WaitForSeconds(11);
        canMove = true;

    }


    // Update is called once per frame
    void Update()
    {
        if (canMove)
        {
            if (Input.GetAxisRaw("Horizontal") != 0 || Input.GetAxisRaw("Vertical") != 0)
            {
                canMove = false;
                StartCoroutine(MoveCoroutine());

            }

        }

    }
}
방향키를 누른다음 canMover가 false가 되기때문에 코루티가 다중사용되는 것을 막을 수 있다.
그 다음 코루티 함수 안에 canMove를 다시 true로 실행해준다.
using System.Collections;
using System.Collections.Generic;
using UnityEngine;

public class MovingObject : MonoBehaviour
{
    public float speed;
    private Vector3 vector;

    public float runSpeed;
    private float applyRunSpeed;
    private bool applyRunFlag = false; // 쉬프트가 눌리면 2칸씩 이동되는 것을 방지하기위해서

    public int walkCount;
    private int currentWalkCount;

    private bool canMove = true;

    //speed=2.4, walkCount=20
    //2.4*20=48

    void Start()
    {

    }

    IEnumerator MoveCoroutine()
    {
        if (Input.GetKey(KeyCode.LeftShift))
        {
            applyRunSpeed = runSpeed;
            applyRunFlag = true; //쉬프트가 눌렸으면 플래그 true
        }
        else
        {
            applyRunSpeed = 0;
            applyRunFlag = false; // 쉬프트가 안눌렸으면 플래그 false
        }

        vector.Set(Input.GetAxisRaw("Horizontal"), Input.GetAxisRaw("Vertical"), transform.position.z);

        while (currentWalkCount < walkCount)
        {
            if (vector.x != 0)
            {
                transform.Translate(vector.x * (speed + applyRunSpeed), 0, 0);
            }
            else if (vector.y != 0)
            {
                transform.Translate(0, vector.y * (speed + applyRunSpeed), 0);
            }

            if (applyRunFlag)
            {
                currentWalkCount++;
            }
            currentWalkCount++;
            yield return new WaitForSeconds(0.01f);
        }

        currentWalkCount = 0;
        canMove = true;
    }

    // Update is called once per frame
    void Update()
    {
        if (canMove)
        {
            if (Input.GetAxisRaw("Horizontal") != 0 || Input.GetAxisRaw("Vertical") != 0)
            {
                canMove = false;
                StartCoroutine(MoveCoroutine());
            }
        }
    }
}applyRunFlag가 true인 경우 (Shift 키가 눌렸을 때), currentWalkCount를 1 증가시킨다. 이는 Shift 키가 눌렸을 때는 두 칸씩 이동하지 않도록 하는 역할을 한다.
728x90
'{Unity}' 카테고리의 다른 글
| 유니티 스터디 - 게임 개발 속성 강의 (2) (2) | 2024.11.15 |
|---|---|
| 유니티 스터디 - 게임 개발 속성 강의 (1) (1) | 2024.11.08 |
| 유니티 쯔꾸르 게임 만들기 4 (인프런) (0) | 2023.07.01 |
| 유니티 쯔꾸르 게임 만들기 3 (인프런) (0) | 2023.07.01 |
| 유니티 쯔꾸르 게임 만들기 2 (인프런) (0) | 2023.07.01 |


