
✏️이 글은 나도 코딩님의 유니티 무료 강의 5시간 게임 개발 속성 강의를 듣고 내용을 정리한 것입니다. 유니티를 처음 공부하시는 분들이 보기에 좋은 강의라서 추천드려요!
출처 🔽
https://www.youtube.com/watch?v=rJE6bhVUNhk&t=9529s
👉유니티 훑어보기
💠 Hierarchy (하이라키 뷰)

- 게임 내의 요소들이 구성되는 곳
- 마우스 오른쪽 버튼 클릭 → 여러 게임 오브젝트 추가 가능!

- 2D object → sprities → square로 추가한 결과
💠 Scene view (스크린 뷰)

- scence 뷰는 게임을 만드는 과정을 볼 수 있다
💠Tool bar

위에서부터 차례대로
- 뷰 튤 (화면 전체 이동)
- 무브 툴 (화살표가 생김, 화살표대로 이동 가)
- 로테이트 툴 (회전 가능)
- 스케일 툴 (크기 조절 가능)
- 렉트 툴 (크기 자유롭게 조절 가능)
- 트렌스 툴(모든 기능을 합친 것)
💠Game view

- game 뷰는 게임 화면에서 보여지는 모습을 볼 수 있다
- Scale: 크기를 조절 수 있다
- Free Aspect : 비율을 조절할 수 있다 (해상도 지정 가능)
💠 Inspector (게임 오브젝트가 가지는 속성)

Transform (모든 게임 오브젝트가 기본으로 가지는 속성)
- position : 위치
- rotation : 회전
- scale : 크기
Sprite Renderer
- Flip : x의 기준 y의 기준
➕Rigidbody 2d : 물리법칙을 적용하는 컴포넌트 (알아두기!)
➕ alt를 누르면 자동으로 뷰 툴로 전환됨
💠 Project View

💠 Edit → Preferecne →Extrenal Tool
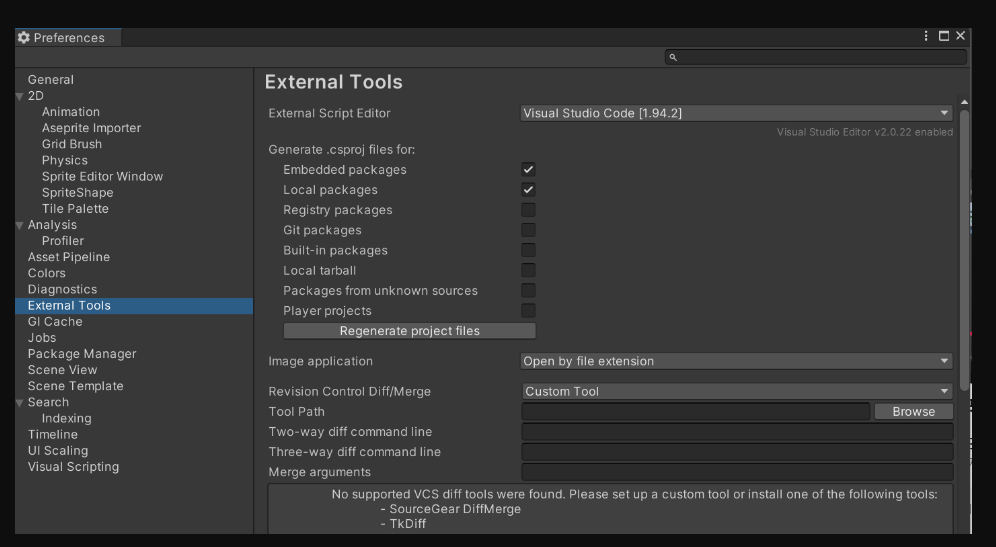
- 비주얼 스튜디오 코드로 변경해주기
🖥️실행화면

💠Console View

- 스크립트에 문제가 있거나 스크립트에서 남기는 출력문 로그를 확인할 수 있다
👉게임 이미지 구하기
🔍 character sprite site opengameart.org 를 검색하면 무료 소스 다운 가능하다.
👉배경 만들기 (움직이는 배경 포함)

- Pixeis Per Unit : 하나의 네모 칸에 몇 픽셀 만큼 사용할 것인지 적는 것

- 작동 원리는 컨베이어 벨트를 생각 하면 된다
- 스크립트에서 스크롤을 구현
using System.Collections;
using System.Collections.Generic;
using UnityEngine;

public class Background : MonoBehaviour
{
    private float moveSpeed =3f;

    void Update(){

        transform.position += Vector3.down * moveSpeed*Time.deltaTime; //아래쪽으로 이미지를 내림
         //Time.deltaTime 서로 성능이 다른 pc에서도 똑같은 위치만큼 이동
        if(transform.position.y<-10){
            transform.position += new Vector3(0,20f,0);
        }//y값이 -10보다 작아지면 다시 위로 올림
    }
}
👉플레이어 만들기
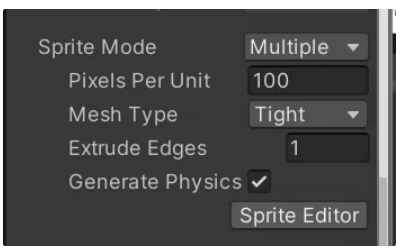
- Sprite Mode를 Multiple로 설정해준다.
💠Sprite Editor 사용

- slice 사용 사이즈로 자를 수도 있고 칸으로 자를 수도 있다

- 캐릭터를 배경 위에 배치하고 싶으면 Order in Layer의 값을 올려줄 것
💠 Window → animation 선택
플레이어 애니메이션을 설정하고 싶을 때 사용!

- samples는 prame per second ,( 지금은 1초동안 12번 이미지가 전환되는 것)
👉키보드로 움직이기
다음과 같은 코드를 사용해서 키보드로 움직이는 것을 구현할 수 있습니다.
using System.Collections;
using System.Collections.Generic;
using UnityEngine;

public class Player : MonoBehaviour
{   [SerializeField] //유니티 상에서 값을 넣어줄 수 있게함
    private float  moveSpeed;

    void Update() {
        float horizontalInput = Input.GetAxisRaw("Horizontal");// 키보드 좌우방향키를 누르면 값이 저장되는 것
        float verticalInput = Input.GetAxisRaw("Vertical");// 키보드 상하방향키를 누르면 값이 저장되는 것
        Vector3 moveTo = new Vector3(horizontalInput,verticalInput,0f);
        transform.position+=moveTo*moveSpeed*Time.deltaTime;
    }
}

-----

using System.Collections;
using System.Collections.Generic;
using UnityEngine;

public class Player : MonoBehaviour
{   [SerializeField] //유니티 상에서 값을 넣어줄 수 있게함
    private float  moveSpeed;

    void Update() {
        float horizontalInput = Input.GetAxisRaw("Horizontal");// 키보드 좌우방향키를 누르면 값이 저장되는 것
        //float verticalInput = Input.GetAxisRaw("Vertical");// 키보드 상하방향키를 누르면 값이 저장되는 것
        Vector3 moveTo = new Vector3(horizontalInput,0f,0f);
        transform.position+=moveTo*moveSpeed*Time.deltaTime;
    }
}
using System.Collections;
using System.Collections.Generic;
using UnityEngine;

public class Player : MonoBehaviour
{   [SerializeField] //유니티 상에서 값을 넣어줄 수 있게함
    private float  moveSpeed;

    void Update() {
        // float horizontalInput = Input.GetAxisRaw("Horizontal");// 키보드 좌우방향키를 누르면 값이 저장되는 것
        // //float verticalInput = Input.GetAxisRaw("Vertical");// 키보드 상하방향키를 누르면 값이 저장되는 것
        // Vector3 moveTo = new Vector3(horizontalInput,0f,0f);
        // transform.position+=moveTo*moveSpeed*Time.deltaTime;

       Vector3 moveTo = new Vector3(moveSpeed*Time.deltaTime,0,0);
       if(Input.GetKey(KeyCode.LeftArrow)){
        transform.position -=moveTo;
       }else if(Input.GetKey(KeyCode.RightArrow)){
        transform.position +=moveTo;
       }

    }
}
* 장애물은 주로 Collider 를 사용한다 (box, circle 등등)
👉마우스로 움직이기
마우스로 플레이어를 움직이게 하려면 다음과 같이 구현하면 됩니다.
using System.Collections;
using System.Collections.Generic;
using Unity.Collections;
using UnityEngine;

public class Player : MonoBehaviour
{   [SerializeField] //유니티 상에서 값을 넣어줄 수 있게함
    private float  moveSpeed;

    void Update() {
        // float horizontalInput = Input.GetAxisRaw("Horizontal");// 키보드 좌우방향키를 누르면 값이 저장되는 것
        // //float verticalInput = Input.GetAxisRaw("Vertical");// 키보드 상하방향키를 누르면 값이 저장되는 것
        // Vector3 moveTo = new Vector3(horizontalInput,0f,0f);
        // transform.position+=moveTo*moveSpeed*Time.deltaTime;

    //    Vector3 moveTo = new Vector3(moveSpeed*Time.deltaTime,0,0);
    //    if(Input.GetKey(KeyCode.LeftArrow)){
    //     transform.position -=moveTo;
    //    }else if(Input.GetKey(KeyCode.RightArrow)){
    //     transform.position +=moveTo;
    //    }

    Vector3 mousePos =Camera.main.ScreenToWorldPoint(Input.mousePosition);
    float toX = Mathf.Clamp(mousePos.x,-2.35f,2.35f);
    transform.position = new Vector3(toX,transform.position.y,transform.position.z);


    }
}
👉미사일 만들기
using System.Collections;
using System.Collections.Generic;
using UnityEngine;

public class Weapon : MonoBehaviour
{
    [SerializeField]
    private float moveSpeed =10;

    void Update() {
        transform.position += Vector3.up*moveSpeed*Time.deltaTime;

    }
}
💠똑같은 게임 오브젝트를 여러번 반복사용
→ Prefabs 사용하기
세부 속성을 정해뒀다가 필요할 때마다 게임 오브젝트를 꺼내 사용할 수 있다

using System.Collections;
using System.Collections.Generic;
using Unity.Collections;
using UnityEngine;

public class Player : MonoBehaviour
{   [SerializeField] //유니티 상에서 값을 넣어줄 수 있게함
    private float  moveSpeed;

    [SerializeField]
    private GameObject weapon;

    [SerializeField]
    private Transform shootTransform; //플레이어 머리 위에서 발사되는 예측값

    void Update() {
        // float horizontalInput = Input.GetAxisRaw("Horizontal");// 키보드 좌우방향키를 누르면 값이 저장되는 것
        // //float verticalInput = Input.GetAxisRaw("Vertical");// 키보드 상하방향키를 누르면 값이 저장되는 것
        // Vector3 moveTo = new Vector3(horizontalInput,0f,0f);
        // transform.position+=moveTo*moveSpeed*Time.deltaTime;

    //    Vector3 moveTo = new Vector3(moveSpeed*Time.deltaTime,0,0);
    //    if(Input.GetKey(KeyCode.LeftArrow)){
    //     transform.position -=moveTo;
    //    }else if(Input.GetKey(KeyCode.RightArrow)){
    //     transform.position +=moveTo;
    //    }

    Vector3 mousePos =Camera.main.ScreenToWorldPoint(Input.mousePosition);
    float toX = Mathf.Clamp(mousePos.x,-2.35f,2.35f);
    transform.position = new Vector3(toX,transform.position.y,transform.position.z);
    Shoot();
    }

    void Shoot(){
        Instantiate(weapon,shootTransform.position,Quaternion.identity); //게임 오브젝트를 만드는 메소드
    }
}

using System.Collections;
using System.Collections.Generic;
using UnityEngine;

public class Weapon : MonoBehaviour
{
    [SerializeField]
    private float moveSpeed =10;

    void Start(){
        Destroy(gameObject,1f);
    }

    void Update() {
        transform.position += Vector3.up*moveSpeed*Time.deltaTime;

    }
}
게임 구현 동영상은 추후 추가해보겠습니다.
'{Unity}' 카테고리의 다른 글
| 유니티 스터디 - 탑뷰 액션 게임 업그레이드 하기🆙 (2) | 2024.11.22 |
|---|---|
| 유니티 스터디 - 게임 개발 속성 강의 (2) (2) | 2024.11.15 |
| 유니티 쯔꾸르 게임 만들기 4 (인프런) (0) | 2023.07.01 |
| 유니티 쯔꾸르 게임 만들기 3 (인프런) (0) | 2023.07.01 |
| 유니티 쯔꾸르 게임 만들기 2 (인프런) (0) | 2023.07.01 |


